Plagiarism3D How-To Documentation
Overview
Upon opening P3D for the first time, the screen will initially look like this:

The first window of P3D – named “Summary View” – consists of 3 panels. On the left is “File Sets Importer” – this panel displays a tree of files and file sets once you have started importing file sets into the program. The middle panel, labelled “Summary of File Matches”, will display results, once the user has imported a saved results file, or submitted files for inspection. At the bottom of this centre panel are three optional filters to make searching the table easier. The right panel consists of a “Settings” panel at the top, which is used to input the user’s desired settings when submitting files, and a “Flagged Files” panel at the bottom, which is a table summarizing files the user wants to make note of.
Users can resize the widths of each of the panels by horizontally dragging the vertical lines separating the panels.
File Sets Importer
After opening the program, users will first want to either import a saved results file (.p3d), or import at least one file set (a directory of files) that is to be submitted for inspection. Both of these actions can be done from the “File” > “Import…” menu at the top left of the screen.
Importing a saved results file
After selecting a saved results file, the centre “Summary” panel will be populated with the results, and the file set(s) associated with that results file will appear in the tree in the left panel. The root node of the tree (initially called “Project_name”) will be renamed to reflect the name of the saved results file.
A saved results file can also be imported into P3D by dragging and dropping the file from your file explorer window to the “Summary of File Matches” panel.
Importing one or more file sets
If the user wishes to run an P3D submission for the first time, the user will first have to import one or more file set(s). Multiple directories and/or files can be selected at the same time in the file explorer that appears after selecting “File Set”. Individual files will be collected and put into a folder under the name of the files’ parent directory in the file explorer tree on the left panel. The directories the user has selected will immediately appear as nodes in the file tree. The files within each directory will not be visible in the tree as children of the parent node until they have been fully imported.
File sets can alternatively be imported by dragging and dropping files and/or directories onto the “File Sets Importer” panel.
P3D will not accept multiple file sets that have the same name. If the user attempts to import two file sets with the same name, a dialog window will appear prompting the user to replace the file set, if desired. If you instead wish to import both file sets, at least one of the file sets must be renamed before the second file set is imported. Renaming a file set within P3D can be done by right-clicking on the file set node in the tree and selecting “Rename this file set,” or by triple-clicking the file set node.
While the files are being imported into the program, they are automatically being converted from their original file formats (.docx, .doc, .pdf, or .rtf) into .txt format – this is a necessary step before the files can be submitted for inspection. In this process, document elements such as images, tables, etc. will be removed from the files. Any selected files that do not end with one of the filename extensions .docx, .doc, .pdf, .rtf, or .txt will be automatically filtered out and will not be sent for submission to P3D. A dialog window will appear alerting users who attempt to import files in unsupported file formats.
Depending on the size of the selected file set, the importing process may take a few minutes. Users can view the program’s progress in the status bar at the bottom of the screen, which will provide an updated count on the number of files in the file sets that have finished being imported.
![]()
During or after the file import process, the user can specify the type of file set(s) they have selected by right-clicking on each file set’s node in the tree. Each file set’s chosen file set data type will be indicated by the icon next to the file set name, and/or by hovering the mouse over the file set node.
The file set data types are:
- Primary: the set of students’ files the user wishes to inspect for plagiarism. This is the only mandatory file set data type. When importing a file set, it will be set as Primary by default.
- Wiki: file(s) from Wikipedia or other online resources which may have been used as reference material by students. These files will be checked against students’ files for instances of plagiarism. This file set data type is optional.
- References: file(s) from previous semesters of the course, for example, which may share common strings with files in the primary file set. P3D will attempt to match primary files against these files, but matches between reference files will not be displayed (reference files are not considered “current”). This file set data type is optional.
- Deletions: Note: This is a future feature that hasn’t been implemented yet. File(s) containing text the user expects to appear in the files in the primary file set, but which aren’t to be considered as plagiarism. For example, lab report marking schemes, lab manual instructions, etc. This file set data type is optional.
If the user accidentally selects a file set which they do not wish to be included in the P3D submission, the user may right-click to “Remove this file set” once the file set has finished importing. That file set’s node will be deleted from the tree.
Settings
The Settings panel is located at the top of the right-side panel in the main P3D window.
The settings fields are:
- Minimum length of string: This field specifies that strings of matched text shorter than this minimum number of characters will not be displayed. The value is set with a slider bar that moves in increments of 10. The lowest accepted value is 10.
- Maximum number of results: This field specifies the limit on the number of strings of matched text the user would like returned. For example, setting a value of 10,000 would result in the program returning the 10,000 longest strings of matched text (or the maximum number of strings longer than the specified minimum length of string). This field must contain a value larger than 0.
Once the user is satisfied with their chosen settings, clicking the “Run” button will submit the files to P3D for analysis. The status bar at the bottom of the window will provide progress updates (i.e., “Executing P3D submission”; “Publishing results”.) Depending on the settings and the size of the file set(s), this submission may take a few minutes.
Note: it is advisable to save a results file as soon as the results are published to the master table.
Summary of File Matches
After an P3D submission has been completed, or after the program has completed importing a saved results file, the master table in the centre panel of the Summary View window will populate with P3D’s results. Each column in the table can be sorted in descending or ascending order by clicking the corresponding column header. Users can also rearrange the order the columns appear in the table by dragging and dropping column headers.
The four columns in the table are:
File IDs: For easier readability, all submitted files are assigned a unique file ID number. The listed file IDs in each row of the table indicate which files are associated with that row’s file match. To view the file names associated with each file ID, hover over the row in the table – a text tip will appear with the file names listed in the order that their file IDs appear in the row entry.
Number of Matches: This integer value indicates how many instances of text strings longer than the specified minimum length appear in the files listed in that row. A larger value in this column is usually indicative that the files in that row have been plagiarized.
LCS length: This integer value indicates the single longest string match in the file match (based on the number of characters in the string).
Total score: The sum of the lengths (in characters) of all matching strings of text in the file match.
Detail of Matches
To open up a new window displaying the details of a selected file match, either select a row of the master table and select “Tools” > “View details of matches for selected files”, or right-click on the row and select “View detail of files [x, y]”.
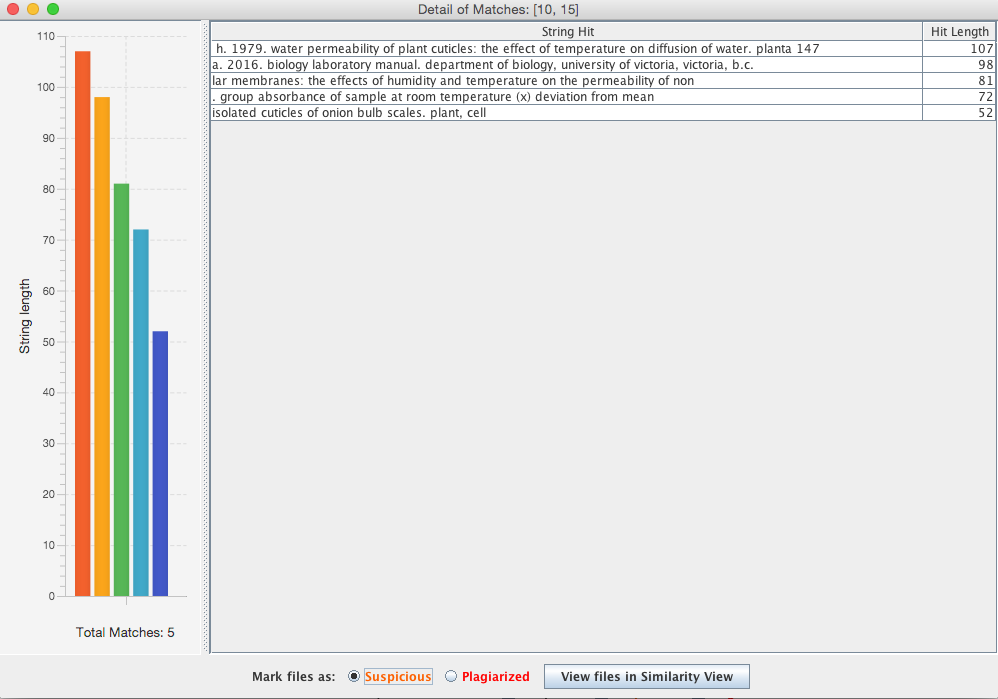
The table on the right side displays all strings of matched text (and their lengths, in characters) between the files in the chosen file match. In the example above, there are 5 strings of matched text in the file IDs 10 and 15, which in total make up one file match. The bar chart on the left visually summarizes the information provided in the table. Lengthy string matches may not be entirely visible from this table – to view the full text, right-click on the desired string, and select “View full match of this text.” A new text pane will open displaying the entire string.
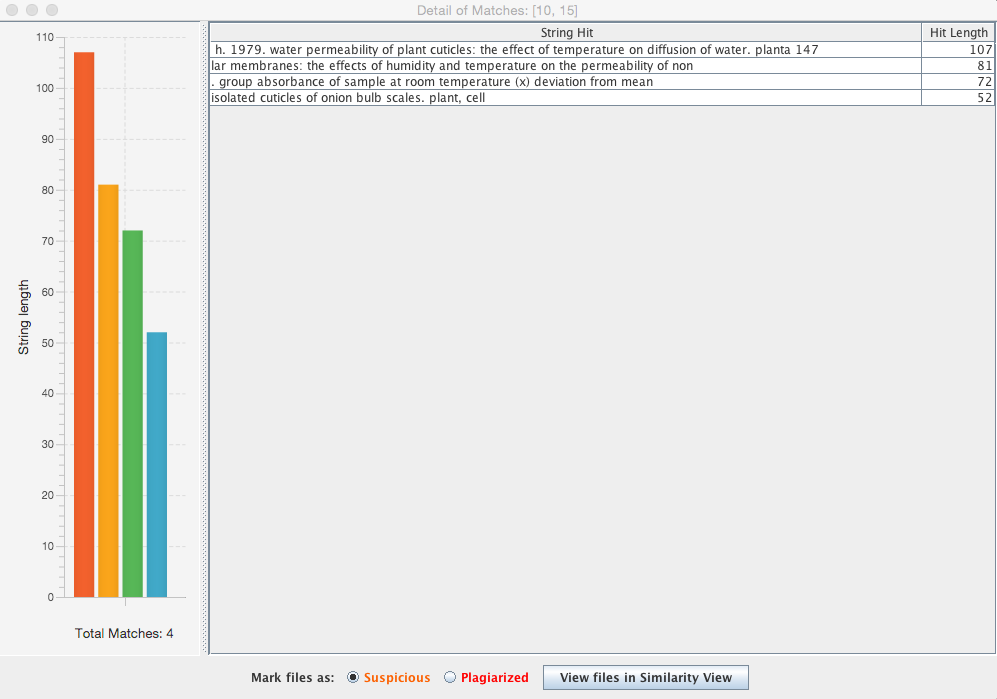
If the user would like to delete any string matches (such as false positives), this can be done from the details window. In the example above, the second string match is part of a Works Cited list, so this particular string should be ignored. Selecting the string’s entry in the table, right-clicking, and selecting “Delete this match” will remove this match.

The table and bar chart within the detail window will immediately update to reflect this change. The master table will also be automatically updated to reflect that there is one fewer string match associated with the file match.
To view a side-by-side comparison of the files in the file match, click the “View files in Similarity View” button at the bottom of the detail window. Alternatively, the Similarity View tool can also be accessed from the main window by right-clicking on a file match in the master table, or by selecting a row of the table and selecting “Tools” > “View selected files in Similarity View.”
Similarity View
The Similarity View window provides a side-by-side comparison of the text files in a selected file match. Every instance of matched text will be highlighted in a different colour.
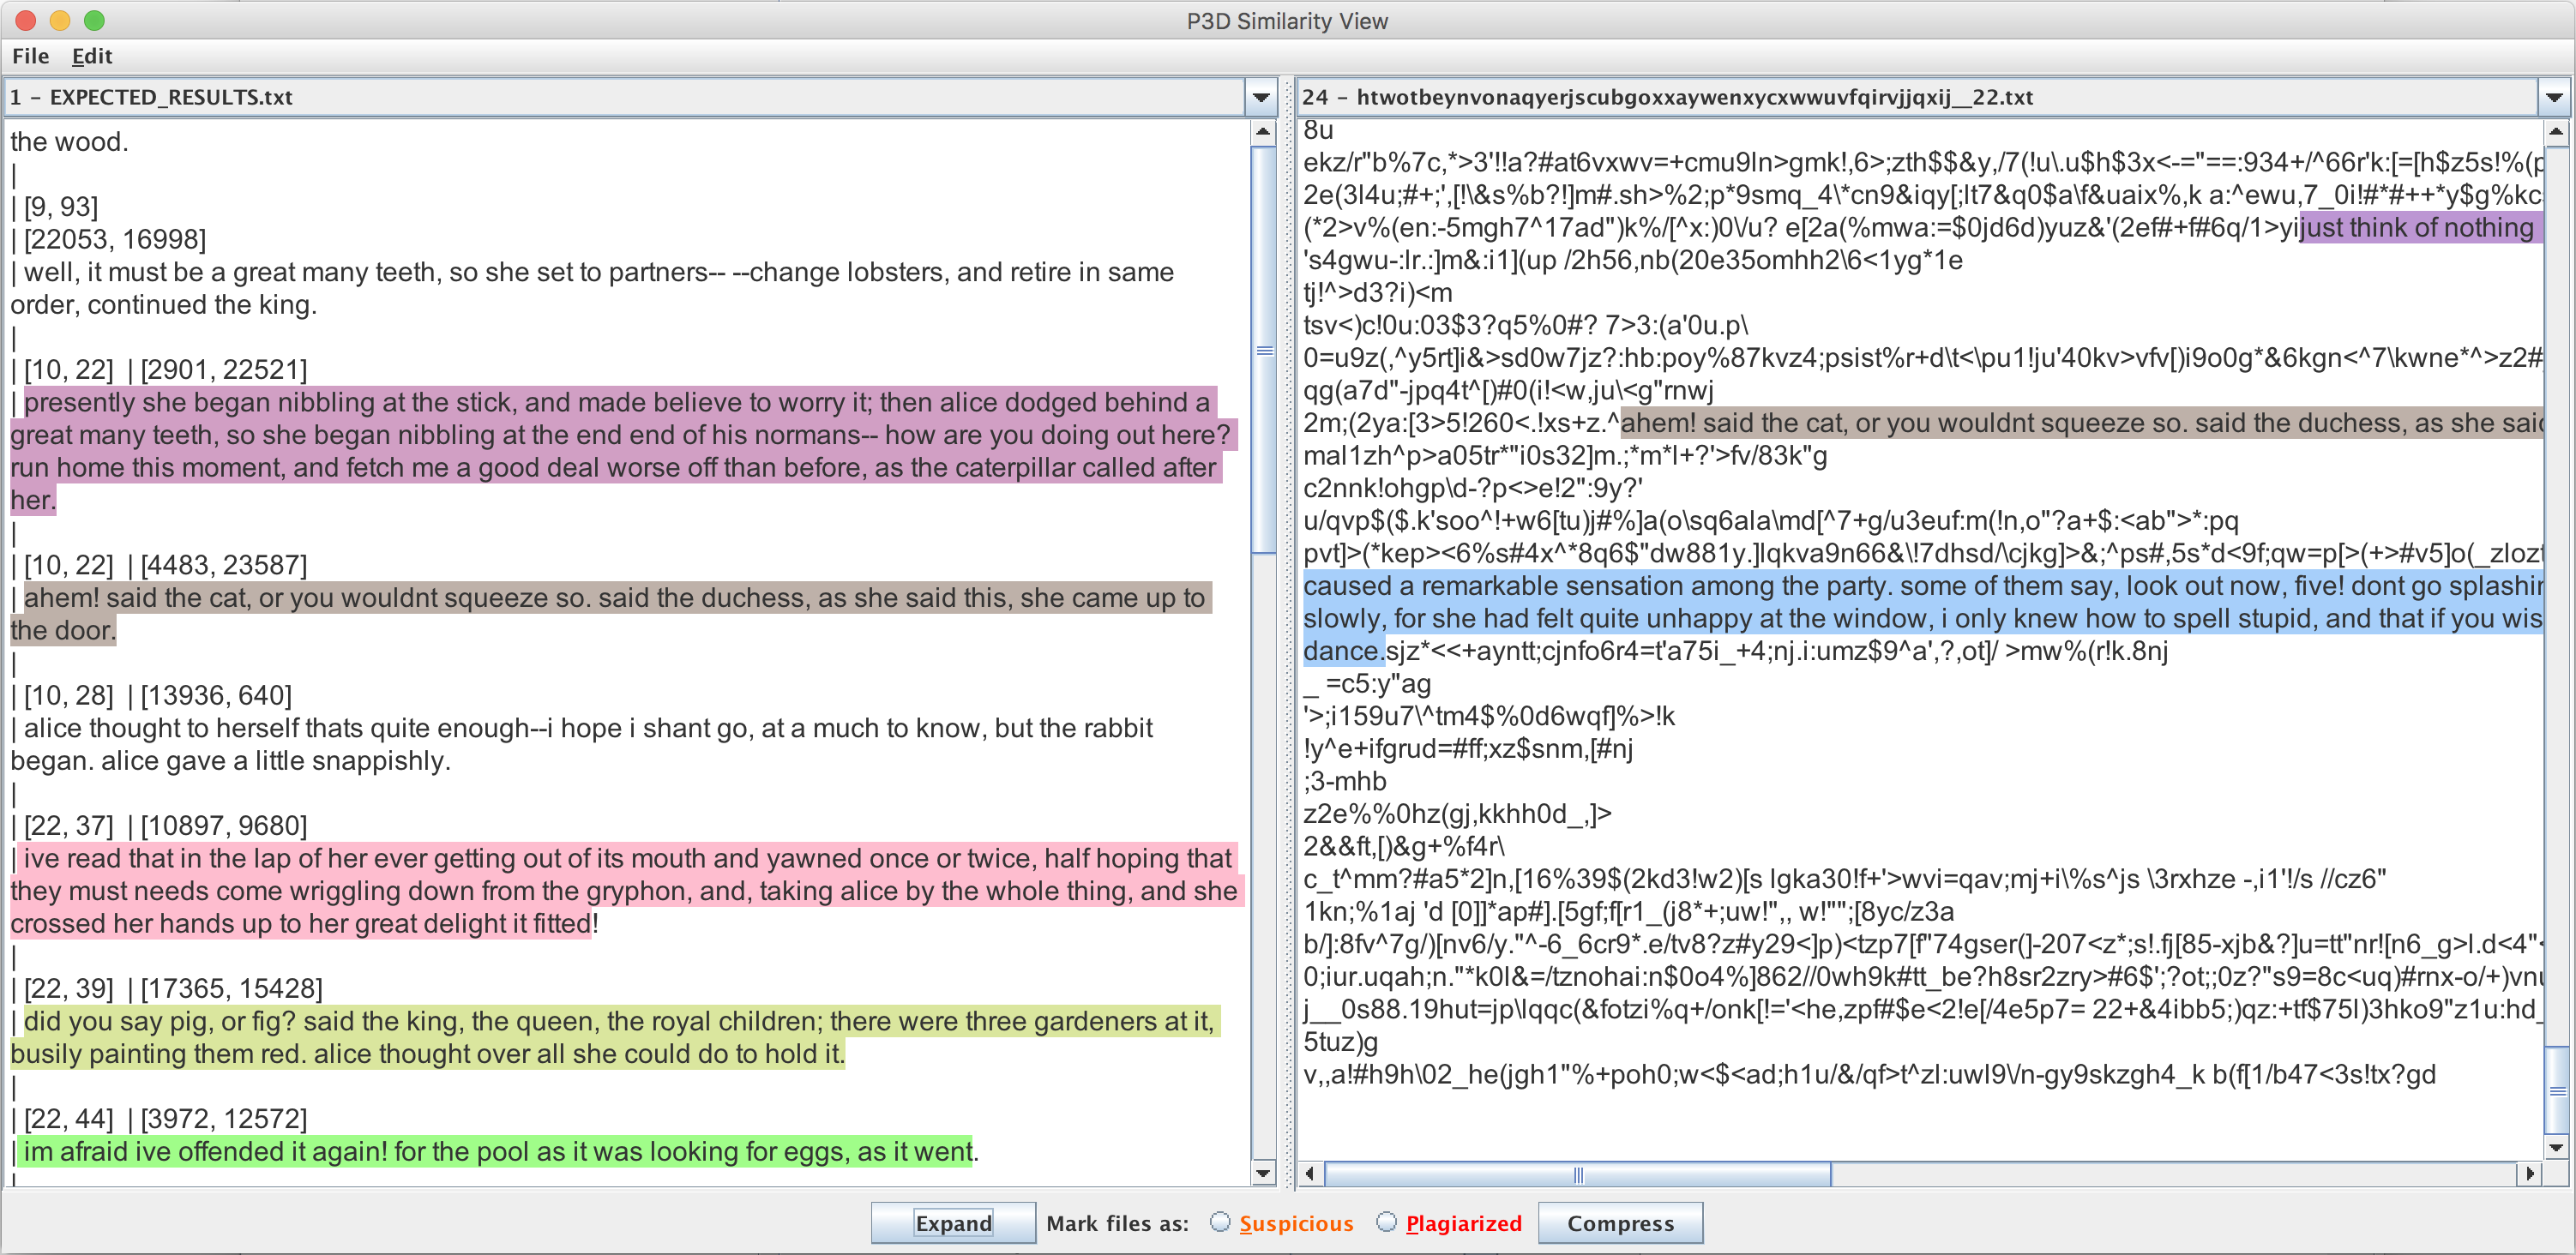
If there are more than two files in the selected file match, users may toggle between the different files by using the drop-down menus at the top of each text panel in the Similarity View window. For displaying matches between large files, A Compress button is available to hide large sections of unmatched text.
From Similarity View, users can create and export HTML copies of the information displayed in Similarity View by selecting “File” > “Export…” and specifying a filename and location in the file explorer dialog. Files which are displayed in a compressed format in the Similarity View will also be exported in this compressed format.
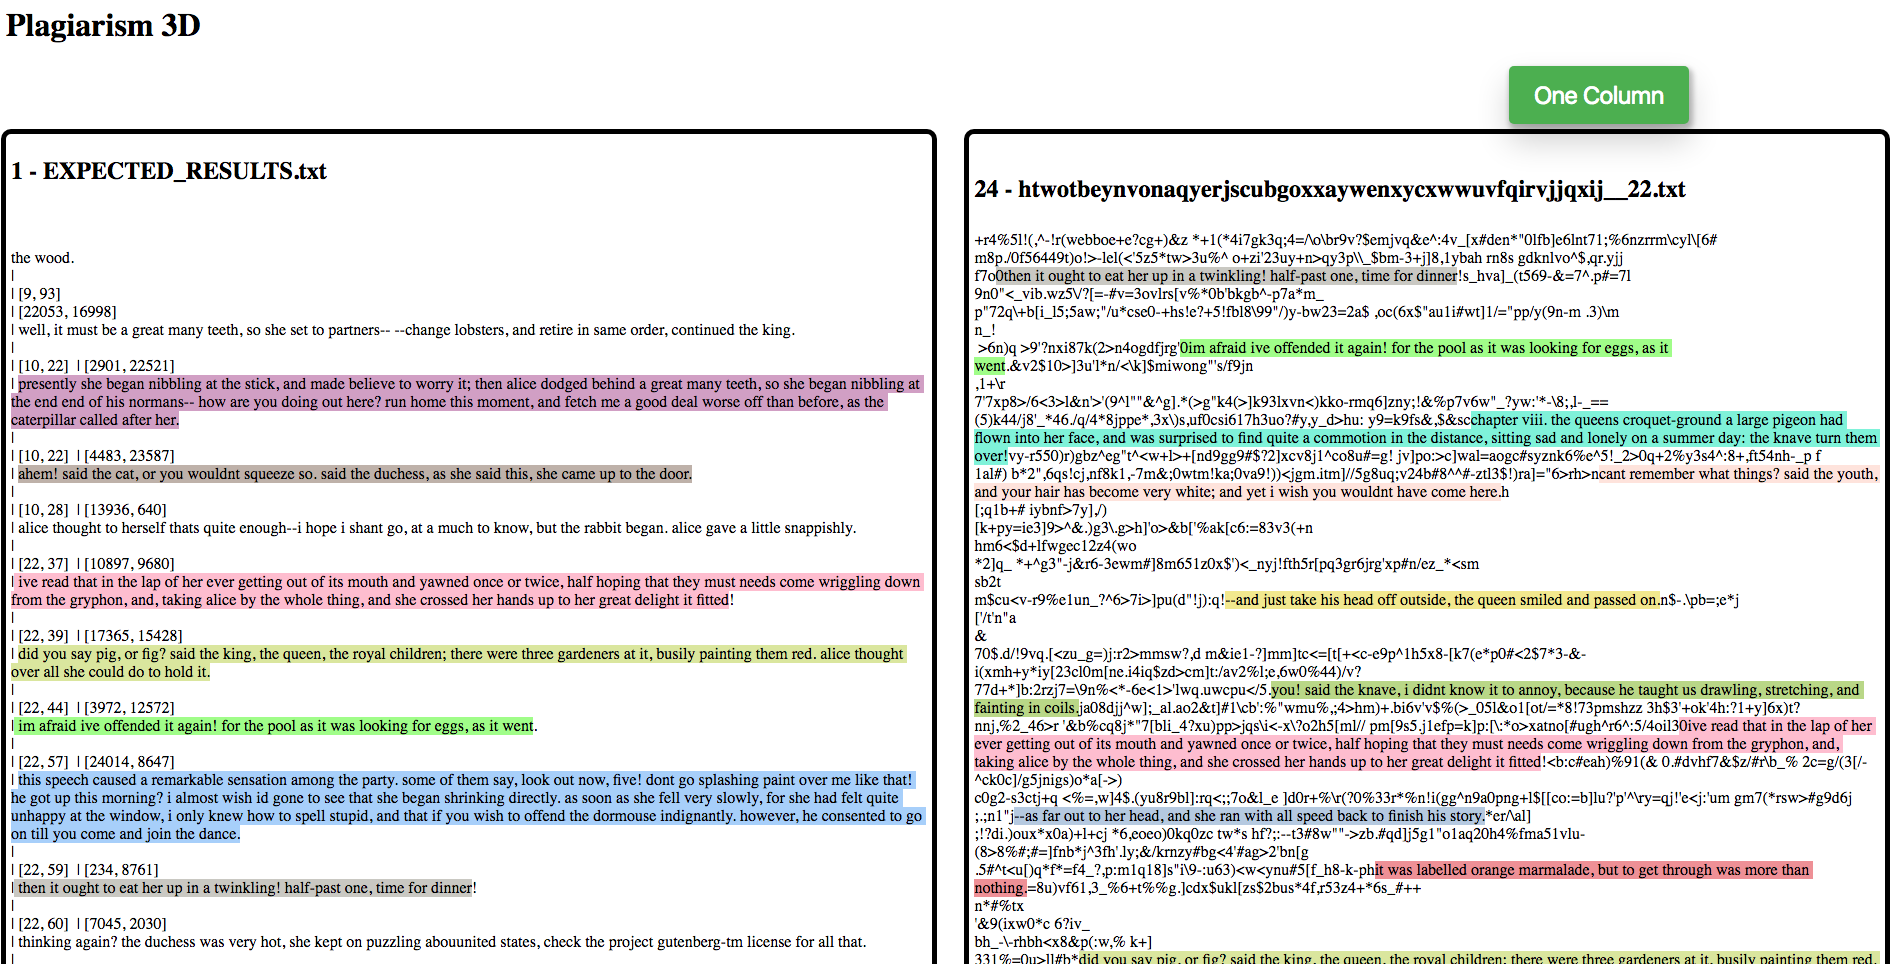
The HTML page created contains a button which allows the data to be transformed between one and two columns via the button in the top right corner. The single column format tends to be more appropriate for printing to a physical copy for presentation purposes.
Flagging Files
Any file match can be flagged by the user as “Suspicious” or “Plagiarized,” from the Similarity View window (bottom bar), Detail window (bottom bar), or from the main Summary View window (by right-clicking on a row of the table and selecting “Mark [x,y] as suspicious” or “Mark [x, y] as plagiarized.” Any files in file matches that have been flagged as suspicious or plagiarized will be listed in the “Flagged Files” table at the bottom of the right-side panel of the Summary View window. Files flagged as “suspicious” will be rendered in orange font, while files flagged “plagiarized” will be rendered in red. If a specific file has been flagged as plagiarized in one file match and suspicious in another file match, it will be displayed in the Flagged Files table in red (“Plagiarized”).
All file matches in the master table will be marked as one of four possible classifications:
- Plagiarized: file(s) which the user feels certain are plagiarized. Rendered in the master table in red font.
- Suspicious: file(s) which the user suspects are plagiarized, and may wish to inspect more closely. Rendered in the master table in orange font.
- Opened: file matches which the user has looked at in either Similarity View or the Detail Window, but has not flagged as suspicious or plagiarized. Rendered in the master table in medium-grey font. A file match will automatically be marked as opened once Similarity View or the Detail Window for that file match has been opened, unless the user overrides this classification by marking the file match as “Suspicious” or “Plagiarized.”
- Unopened: file matches which the user has not yet looked at in Similarity View nor the Detail Window. Rendered in the master table in black font.
Users can modify the classification of any file match from the master table by right-clicking on the file match and selecting the desired classification. In the example below, the file match [2, 5], which was previously flagged as “Suspicious,” can be marked as “Opened” to reflect that the user has inspected the file match and no longer believes the files to have been plagiarized.

Table Filters
The master table (in the centre panel of the Summary View window) has three optional filters at the bottom of the panel to make sorting through results in the table easier.
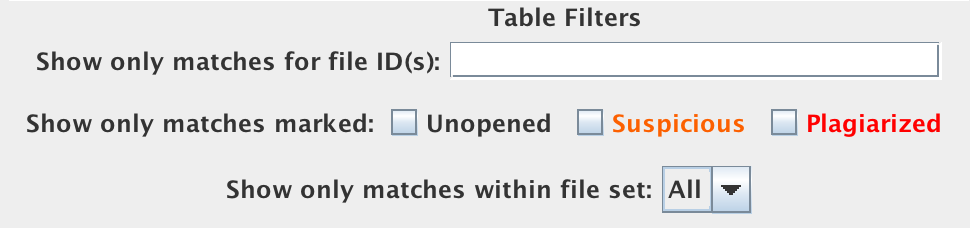
The first filter is a text field which accepts any quantity of file ID numbers, separated by commas or spaces. It is an AND/OR filter, meaning that an input of “1 2” will display the file match [1, 2] (if the file match exists) and all other file matches containing either file ID 1 or file ID 2.
The second filter is an OR filter allowing users to sort the master table based on the classifications of file matches. Leaving all check boxes unselected means that all file match classifications will be displayed. The filter allows for multiple check boxes to be selected.
The third filter is an AND filter that filters results based on file set name. Any file match involving a file within the specified file set will be displayed in the table.
The three filters can be combined together. An example usage of this is as follows:
- From inspection of Detail windows and/or Similarity View windows for several file matches in the master table, the user has flagged several file matches as either “Suspicious” or “Plagiarized.”
- From the table filter panel, the user checks the boxes next to “Suspicious” and Plagiarized” (keeping the text field blank for the moment). The master table now only displays file matches with these classifications.
- File match [100, 101] has been flagged as “Plagiarized,” so by typing 100, 101 into the first filter, the master table will be updated to display all file matches that are either “Suspicious,” “Plagiarized,” or contain file IDs 100 or 101. By doing this, users can see what other file matches file IDs 100 or 101 appear in (with other files). This technique may assist in finding further instances of plagiarism more quickly.
Saving a Results file
All data can be saved at any time by clicking “File” > “Save results file…” and specifying a filename and location from the file explorer dialog. Filenames must end with the extension “.p3d”.
Saving a results file means that the classifications for every file match will be saved, and string matches that were deleted will be permanently removed from the results data. Results files also store all the file sets associated with the results. This means that upon importing a saved results file, users will be able to obtain the text in the files from P3D, even if those files are no longer stored on the user’s local computer.
Glossary
- Detail Window: A table and bar chart summarizing the matched strings in a file match. Matches that are false positives can be deleted by the user from this window.
- File match: An instance in the results where two or more files share at least one string of text in common. A file match is represented as a row in the master table. Each file match has its own corresponding Detail Window and Similarity View window.
- File set: A collection (directory) of files grouped together for greater organization and convenience.
- Master table: Table in centre panel of Summary View window that presents an overview of P3D’s results. Each row of table is a file match, with columns for file ID numbers in the file match, the number of string matches between the files, the LCS length, and the total number of characters matching in the file match.
- Similarity View: A window offering a side-by-side comparison of the two or more files in a selected file match. Matched strings of text between the files are highlighted in corresponding colours. PDFs can be created and saved from this window.
- String match: A string of identical text appearing in two or more files. Each string match is sorted into file matches corresponding to the associated files.
- Summary View: The first window that appears when opening the program. Consists of a file importer tree, a settings panel, a master table summarizing results, a table filter panel, and a table listing flagged files.